How to use Fail2ban to protect your Linux server
Stop brute forcing and cryptojacking malware. This post explains how to setup Fail2ban on Linux servers to prevent adversaries getting easy access to your crown jewels.
Last month it was reported that a cyber criminal group known as the Outlaw group has remained a consistent threat to Linux servers since 2018. Their method of gaining unauthorised access is “a straightforward yet devastatingly effective strategy: brute-forcing Secure Shell (SSH) … then deploying a sophisticated malware suite designed for cryptojacking and botnet propagation”, according to an article from CyberSRC. My mentor at CyberLynk recommended I look into the real world applications of a tool I’d just learnt to implement - Fail2ban - and I thought mitigating the Outlaw groups brute-force entry methods would be an excellent use-case!
Whilst you can almost completely stop the chance of an SSH brute-force attack succeeding by disabling password authentication and using SSH keys instead, they can still cause issues as the attack still eats up system resources required for protocol negotiation. Large organisations use VPNs in front of their SSH service, but this can add complexity and break some software hooks. Fail2ban can be set up before (or in addition to) committing to a full VPN solution, as the tool automatically creates firewall rules that ban specific IP addresses after a specified number of bad login attempts within a set time window.
What is Fail2ban?
Fail2ban is a tool that helps mitigate brute-force authentication attacks on services (usually SSH, but it also works for many other services that require authentication) by automatically altering your firewall rules to ban specific IP addresses after a specified number of unsuccessful login attempts. In this article, I will guide you through installing and configuring Fail2ban on a Linux server (I’m using Ubuntu 24.04.2 here).
1. Installing Fail2ban
Update apt and install Fail2ban from Ubuntu’s repos:
1
2
$ sudo apt update
$ sudo apt-get install fail2ban
Fail2ban should be set up as a background service automatically after install, verify with
1
$ systemctl status fail2ban.service
To be safe, I prefer to stop and disable the Fail2ban service and edit its config before enabling it again, as the default fresh-install behaviour of Fail2ban is sometimes changed in updates (e.g. Fail2ban used to have the SSH service jail enabled by default and install with fail2ban.service not running, now fail2ban.service is run on install with SSH jail enabled). This is to prevent me from accidentally banning myself from a server if they do change things in an update.
1
2
$ sudo systemctl stop fail2ban.service
$ sudo systemctl disable fail2ban.service
Before using Fail2ban in an active environment, I recommend reading the man pages for it and noting the stated ability of a local user to essentially perform DoS attacks using fail2ban.
2. Configuring Fail2ban
Fail2ban’s config files are kept in the /etc/fail2ban directory; there you will find a defaults file called jail.conf. Don’t modify this file directly (it warns you not to in the file’s comments), as this file is often overwritten or improved in distribution updates, and Fail2ban uses jail.conf as a source of default settings for which you have not created overrides.
Instead, you can either create individual profiles for Fail2ban in multiple files within the jail.d/ directory, or create and collect all local settings in a jail.local file. For this guide, we will do the latter.
Create a copy of the contents of the jail.conf in a file called jail.local:
1
2
$ cd /etc/fail2ban
$ sudo cp jail.conf jail.local
Open jail.local in whatever text editor you prefer.
Jail Settings - The [DEFAULT] Section
In the config file, you will see a [DEFAULT] header line. Settings below this header are applied to all services supported by Fail2ban. Specific service jail headers like [sshd] are used elsewhere in the file for specific services; these contain service specific settings that override the defaults set here. I’ve provided a table defining some of the basic settings found in [DEFAULTS] below, note that the comments of the file also provide clear definitions of settings if you want to dive deeper:
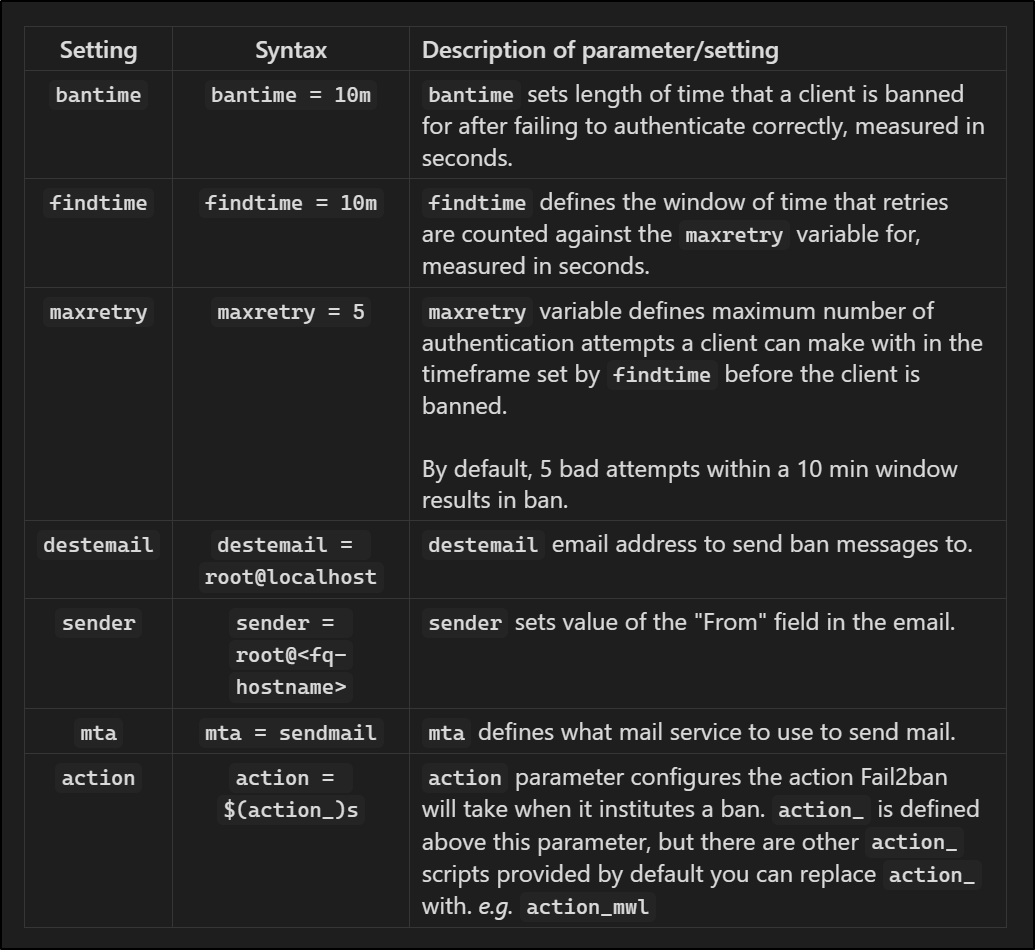 Table providing definitions for some basic settings found under the
 [DEFAULTS] header.
Feel free to modify these settings for experience’s sake, I recommend modifying ‘bantime’ and ‘maxretry’
Jail Settings - Individual Services
The next section of the config file deals with individual services, with each service specified by a section header (i.e. [sshd]). The settings here will override settings in the [DEFAULT] section. Adding the line enabled = true under the header in the settings section will enable the jail for that service, and any information that it needs will be taken from [DEFAULT] unless otherwise overridden here.
Two of the basic parameters you are likely to see here are the filter and logpath parameters.
filter: The
filtervalue is a reference to a file located in/etc/fail2ban/filter.d/with the.confextension removed. These files contain RegEx that determine whether a line in a log is a failed authentication attempt.logpath: The
logpathparameter tells Fail2ban where the logs for the service are stored.
Listing the files in the /etc/fail2ban/filter.d directory will show you the prewritten filters available.
1
$ ls /etc/fail2ban/filter.d/
Opening and reading through a file that looks related to a service you use here is helpful, as the files are usually well documented with comments and you can usually tell what type of condition the script is meant to guard for. If you run a basic website, you could try setting a banning policy for password protected space on your Apache HTTP server; either by setting the filter and logpath settings, or enabling the [apache-auth] jail. I would highly recommend reading DigitalOcean’s blog How Fail2Ban works to protect Services on a Linux Server to gain a deeper understanding of how you can enable Fail2Ban for other services beyond just setting enable = true to a jail in jail.local.
For our guide’s purposes, we will add the line enabled = true under the [sshd] header. Note that this is enabled by default in the main fail2ban.conf file, but this is how you would enable any specific jail.
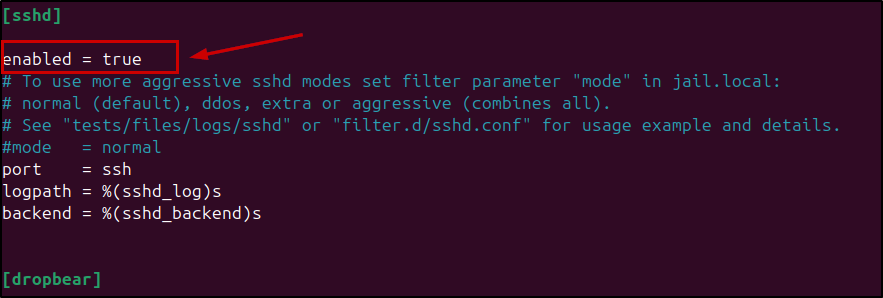 Add line
 enabled = true under [sshd] header in /etc/fail2ban/jail.local to enable the sshd jail
Running Fail2ban
Save your changes to the jail.local file; you are now ready to enable and run Fail2ban!
1
2
$ sudo systemctl enable fail2ban
$ sudo systemctl start fail2ban
Verify it is running with:
1
$ sudo systemctl status fail2ban
3. Test Fail2ban
You can now test your banning policies by attempting to log in via SSH from another server (one that won’t need to log in to the Fail2ban server later) using a nonexistent username and random password.
1
$ ssh not_a_user@your_server_ip
Repeat this until your error message changes from ‘Permission denied’ to something like ‘Connection refused’ or ‘Connection timed out’.
e.g. using my Windows VM:
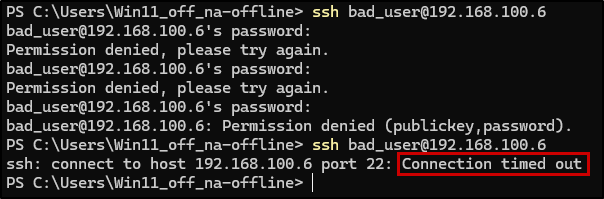 After some bad authentication attempts, my device was banned
On the Fail2Ban server, you can check your iptables rules and you should see that Fail2Ban has created new rules banning your bad server’s IP address.
Shows all rules:
1
$ sudo iptables -S
Pipe to grep to show rules added by Fail2Ban only:
1
$ sudo iptables -S | grep f2b
You can also use fail2ban-client to review the current status for a specific jail:
1
$ sudo fail2ban-client status sshd
Output:
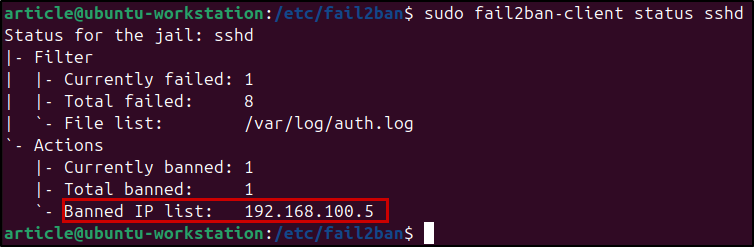 My VM’s IP address has been banned!
Conclusion
You should now be able to implement some basic banning policies and know how to use Fail2ban to protect any type of authentication service, and hopefully feel a bit safer from the outlaws. Try it for yourself and let me know how you go!
thanks for reading, and thank you to CyberLynk for keeping my learning journey fresh and exciting, and encouraging me to take on new challenges and learn new tools!